Pages

Friday, July 29, 2011

A "Slice" of Summer :)

Hello everyone!

Hope you all are enjoying this warm summer weather! I've been sewing mid-day to escape the worst of the heat and humidity! We also went camping at a place that had a waterpark/pool! Very refreshing and I brought along a sewing project! So here is what has been going on since I finished that huge quilt....I tried to get a bunch of little projects done!
 *************************************************************************
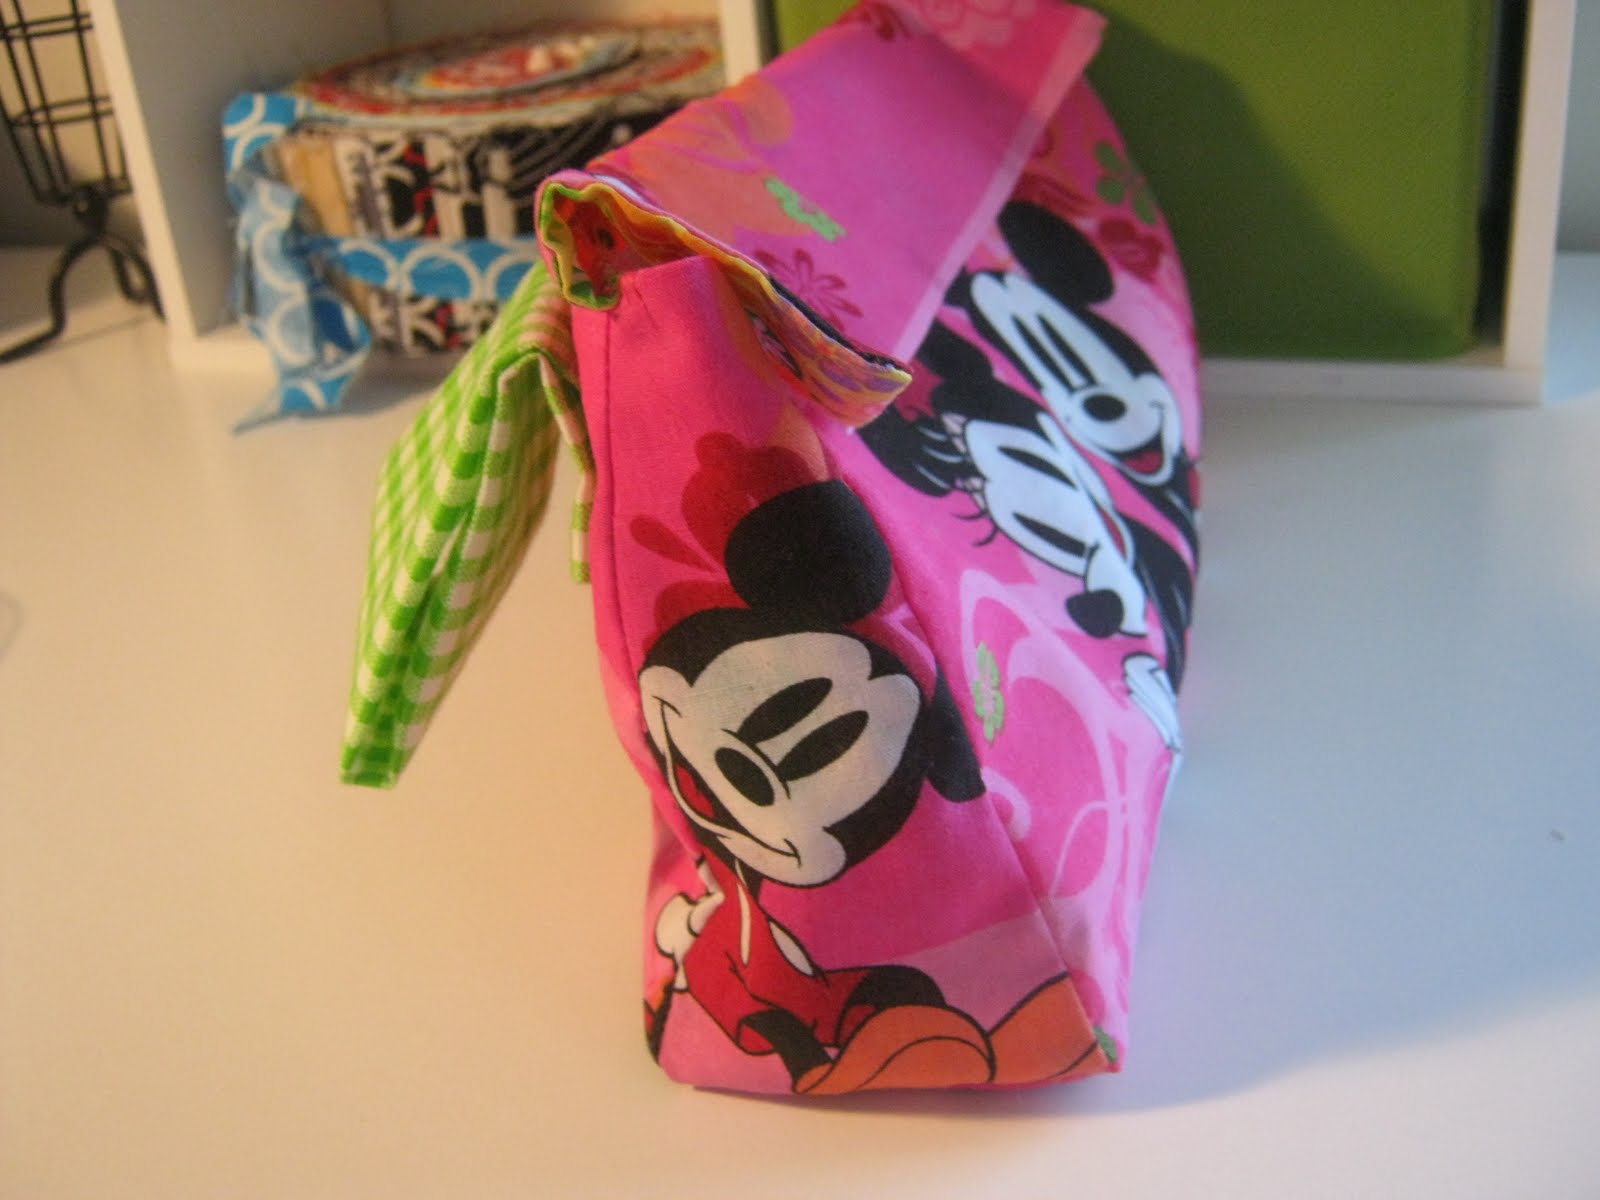
First, a friend asked if I would make her a coupon organizer so I did!  She's a fellow disney fan so I made it with some Mickey and Minnie fabric I had!


 **********************************************************************

Next project was something I was looking forward to doing for a while.  I decorated some onesies using my new Slice Fabrique. I picked some cute designs...a ballerina, a fairy and a butterfly. I also added the baby's name (or I thought I did) below the design. Silly me didn't spell it right so I had to fix it afterwards.
Here is the Slice in action....


Stitching down the design...
 Original design with misspelling....opps!

 These are pics of the "fixed" name and designs....

I am happy to report that the were delivered yesterday to the mom and she was very pleased! Yaa! I hope to make a few more of these in the future!!! (and find out the exact spelling first!)
***************************************************************
Sarah got into the action and decided to make a George the Puppy from our favorite book, Girl's World. She has been updating and decorating her room so a bunch of these would be so cute on her cedar chest at the foot of her bed!


 Woof!


 ************************************************************************
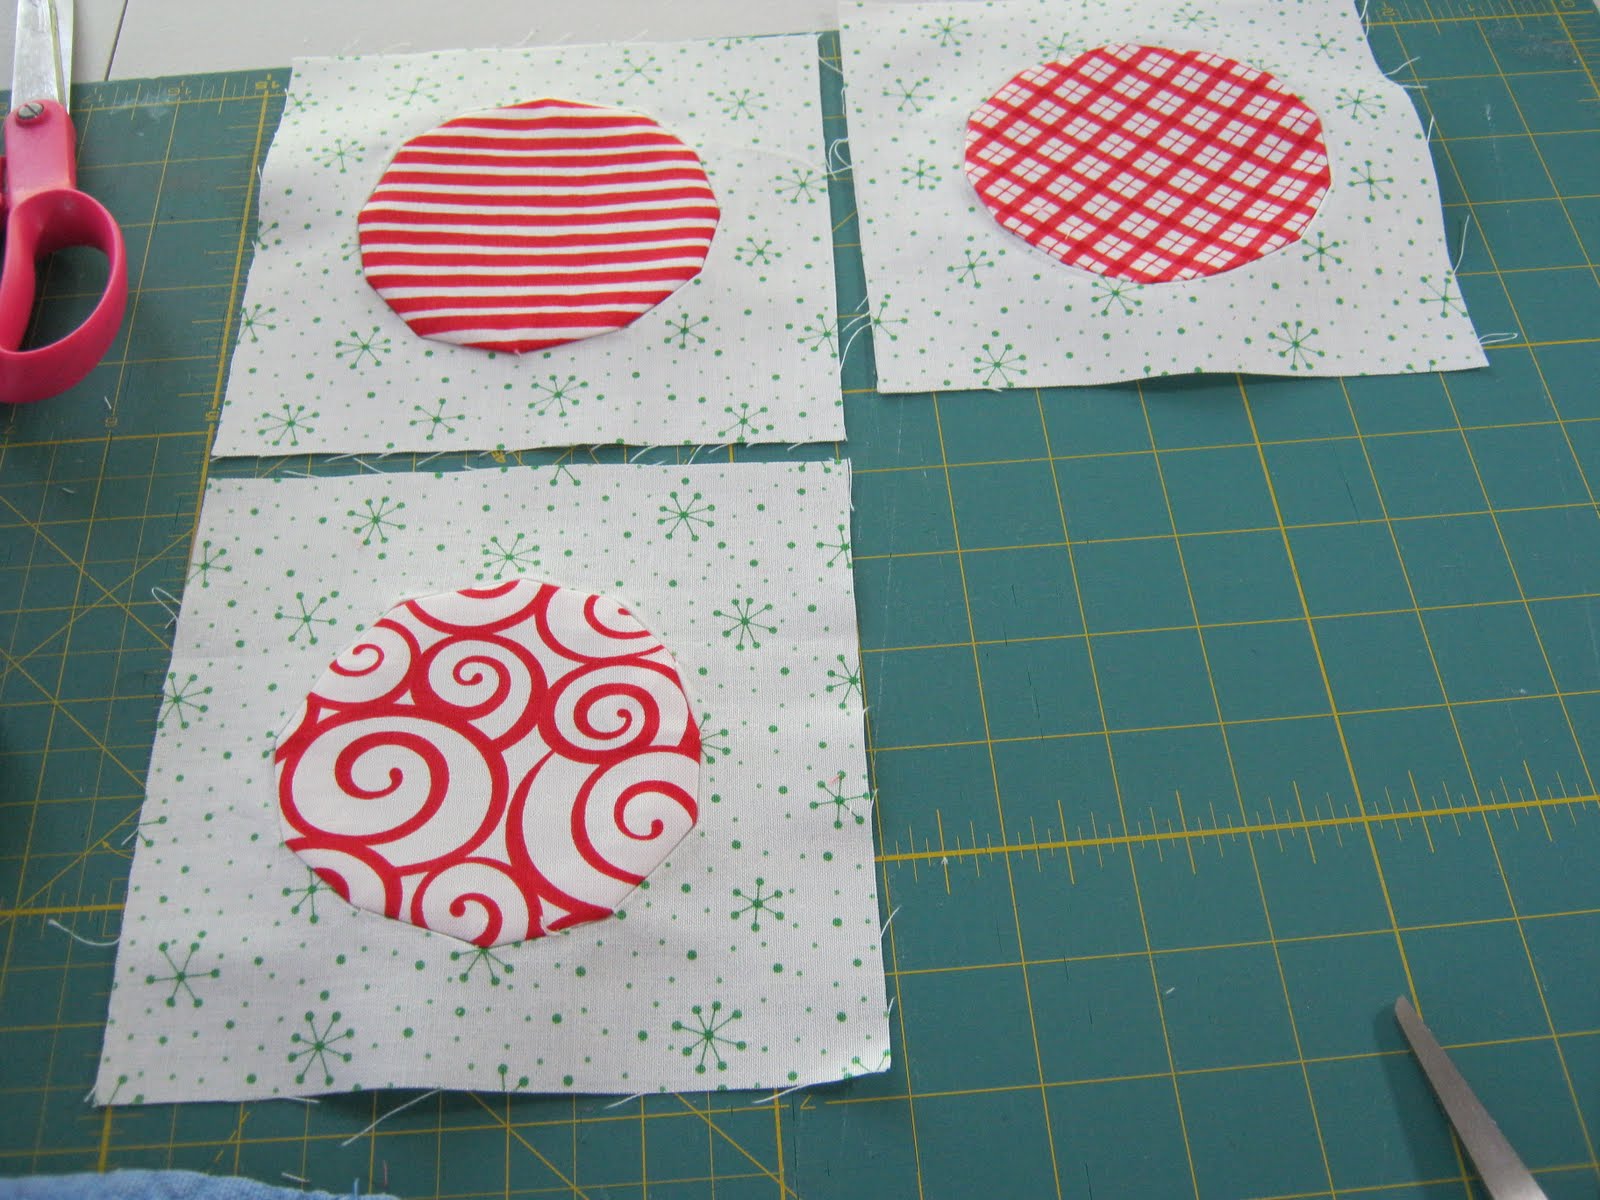
My next project isn't complete. I actually wanted to learn how to make "yo-yo's" with my two new yo-yo makers that I had purchased recently. I thought they would give some added dimension to sewing projects and use up some of my scrap squares I had cut. So I packed up a "sewing box" to bring along on our camping trip. I figured it would give me something to do during the downtime. 


So here is my "box" of supplies, directions on how to make the yo-yo's and my first two attempts. They are actually quite easy and fun to do while you are waiting and watching kids. I have a medium and small size yo-yo maker.
 Here I am down by the pool in the shade with my collection of yo-yo's! Fun! I was also listening to my Disney podcast and drinking a diet soda. Believe me I was quite content for several hours.
 I am not sure what I am going to do with the yo-yo's yet....I have two smaller quilts coming up so maybe I will add them to those. I thought they would look great on a bag or pillow too. You can add buttons or glittery centers and you can layer them as well. Lots of options! If you have any ideas....let me know!

*************************************************************************
 So today, as we were doing the laundry after our camping trip, Sarah asked to make a pillow with owls on it. She loved the Shari Butler design (Critter Jamboree for Slice Fabrique) that she had created to coordinate with her latest fabric line! Sarah picked out the fabric and helped me cut all of the different fabric shapes...


 Then she took off the paper backing and aligned the two "owls" on the fabric square.... then we ironed it down.
 Here is the cute design she was using....everything is labeled and it is so easy to follow along!
 Next, I "applique stitched" both owls with the thread colors that Sarah picked out....
 Gotta love that bright Ottlite!
 We added a border and backing and stitched and stuffed the pillow. Then Sarah had stitched the opening at the bottom and she was done!!!!


 One very happy camper! lol

She picked some cute monkey's for the backing from Urban Zoology by Anne Kelle ( I am in the Fat Quarter Club from the Fat Quarter Shop...I absolutely love, love, love getting fabric surprises every month~swoon!)

Here is George the Puppy and the new pillow on the cedar chest!!

Next up..I don't know...but something will be made to go with this vignette she is creating! LOL!
***************************************************************************

And there you have it...some random but important projects completed before during and after our little vacation!
Up next are two smaller quilts I have been dying to start all summer! So stayed tuned! 
Hugs,
Cathy

PS: Oh and if you want to see the camping trip, its on my other blog....click here!

Saturday, July 16, 2011

Floral Breeze Quilt is complete!

Hello!
I am back with a quick installment to show you my completed Floral Breeze Quilt. I purchased the components in Dec 2008 from JoAnn Fabrics....I loved the colors. Since that time I have learned a lot but I still have a long way to go in terms of quilting...it's really a process both easy and hard...requiring time and patience..but the result is well worth the effort. I try not to stress about the imperfections because that is what we are....imperfect people. I am sure in ten years from now I will look back and cringe at some of my quilting attempts...but maybe not...maybe I will be proud of my attempts to learn new techniques and take on new challenges....not unlike real life!


And just to brag about my wonderful husband....check out what he brought me home this morning from yard saleing.....I don't know anything about the fabric other than I LOVE it!!! It's Springs Industries but I don't know if it is new or old...in any case its about 3 or 4 yards of "Snow White and theSeven Dwarves...all for the bargain price of $3!!!! Score!!!! Now to get a Disney trip to go with it.....hahahahaha!


Have a SUPER weekend and God Bless!
~Cathy

Sewing Stories Goes Horse Crazy


Hello Everyone!
This isn't exactly a sewing story but all the steps required to create this product reminds me of making a quilt or custom outfit!!!  (Read...a LOT of steps!)

Speaking of which, I finished my Floral Breeze Quilt late last night! I will be back with some pics!
~Cathy

Thursday, July 14, 2011

Christmas Quilt Along

Hello Everyone!

Merry Christmas!!!!!


What????

It's not Christmas yet???

Well, apparently for crafters it is time to get their Christmas gifts and store items started!!! So in that spirit, I decided to try my very first "quilt along". What's a "quilt along" you ask? This is when everyone follows a posted pattern and tutorial on the internet and makes an item/clothing piece/quilt etc at the same time and posts pictures along the way. This particular quilt along was organized by Charlie of Qubee Quilts. He even included Christmas recipes (yummy) and raffles for prizes! (course I won nothing but thats not the point..lol) Now, you were supposed to be able to complete the quilt in a day but it took me three days, due to distractions and how slow I sew. But I am pleased with the results!!!  I am going to include some pics along the way and my finished project: A Christmas Quilt  (36" square)..... perfect for a wall hanging!

First I chose the Moda fabric line called Ready Set Snow and I "picked" it up (read...ordered online) from the Fat Quarter shop...my personal favorite!
 Since I was using a different color scheme than what was posted, I used sticky notes and labeled all of my fabric so I didn't get confused. Then I picked out my charms (small squares) which would be featured in the circles.
Next I began making my circles. The method described in the quilt along used wax paper and it didn't work for me so I had to redo my first circle using my own method. I am going to do a tutorial on that (see below). Feel free to try my method if it works better for you!!!
The circles take a while to do...or at least for me....but they are not hard. Here are my first three done:

I finished the circles (on day 2 I think?) then I had to decide where they were going to go and which circles would be bordered in red, and which would be bordered in blue. (see pic above). Then I began adding the borders:


Once the borders around the circles were completed I laid them out in order:
Now, it's this next step that adds some real pizzaz in my opinion! You add triangles to half the squares and it makes it look like a diagonal strip is running through the quilt. I love it! Here it is with the green triangles added to the blue squares. Isn't it cool?????
Of course the next step was to actually sew all these blocks together. Above they are just placed on the floor next to each other!

Yaaa, the quilt top is finished!! Next step is actually turn it into a quilt. For this I laid my backing piece out on the floor right side down. Because this quilt was so small, I just used a 1 yard piece of fabric...fabulous! No pieces or anything! Then I laid the batting on top. I taped these two layers to the floor so they wouldn't pucker or wrinkle. Then I laid the quilt top on top and pinned basted the whole thing.


Then I came to a screeching halt cause I had to figure out how I was going to quilt it. The sample quilt had beautiful diagonal lines made straight using chalk or something. I didn't have that. So after sleeping on it, I decided to stitch-in-the-ditch and make a grid pattern then stipple in the cream background around the circles. This would make the circles "pop". So that's what I did next:


Since it was relatively small, it didn't take too long to quilt. As you can see it was dark out by the time I finished!
On day three I was going to complete this darn quilt!!!!!! So......
The final step was to bind the edges. I trimmed the edges of the quilt sandwich even. I then had to create my own binding. I had a yard of fabric and cut it into two inch wide by the length-of-fabric" lengths. I joined the lengths on an angle like bias tape, which made a super long strip!!!!! Then I readied my iron. I folded the binding in half lengthwise and steam pressed the whole thing. Then I unfolded it and took the raw edges and folded them into the center fold. I pressed the whole thing. Then I folded it in the center with both raw edges folded in (like bias tape) and steam pressed the whole thing. This made the binding 1/2" wide! 
Next, I sandwiched the edge of the quilt into the binding and used a wavy stitch to attach the whole thing. ( It is with much glee I can report I have yet to hand stitch any binding!!) I always cheat and do it this way.


Can you see the wavy stitch?

And then my  project was complete! 
A cute Christmas Quilt! 
Yaa! I took some final pics of course:


And there you have it!
Thanks for reading along!!!!
God Bless and Merry Christmas to all,
Cathy

***************************************************************************
As I mentioned above, I came up with an alternative way of making the circles and took a bunch of pics of all of the steps. This is definitely the most time consuming part of the quilt because it has so many steps.....however, with that said, none of the steps are hard at all and you can really make great circles. Also, I should add....there is a more traditional way of doing circles but I have no idea what that is...hahahaha!
OK so are you ready????? Here we go! 
1. Gather your supplies. I have a circle stencil or you could use a compass or any round object....a roll of masking tape would work too! The point is, you need a smaller circle and a larger circle that is about an inch larger than the smaller one! The cream fabric will become the background and the red charm will be the featured fabric in the circle.


 2. Turn your background fabric with the wrong side up and find the center. (In this case the cream background fabric was about 6" square.) I used a pencil and made a little dot. You don't have to be perfectly centered however. The 6" square will eventually be trimmed square!
 3. I used the 3" and 4" circles and traced them onto the back of the fabric using a pencil. I centered the circle onto the fabric using the dot I made.
 The top half...
 The bottom half....
 Here are the completed circles:
 4. Next I began making a bunch of lines between the inner and outer circle, using my pencil.

 5. Next, I cut out the inner circle
 6. And then I cut tabs by cutting along the lines I drew without cutting into the outer circle. Take your time here!
 7. Next I place the fabric, still right side down, on an ironing board and folded back the tabs to the wrong side of the fabric and ironed them down.

 Use lots of pressure and steam...see a perfect circle!
 I also flipped it over to the right side and gave it another good pressing and steaming!!!
 8. Now this is the fun part! Place your circle with the wrong side up. Use a glue stick and add glue to the tabs. Use plenty!

 9. Now center your smaller charm (right side down) on top of the circle of tabs. Slowly go around the circle and pull the tabs flat and press the charm down to the tab


 10. Flip it over to the right side and make sure you are happy with your circle. Here I noticed at the top right (1 Oclock position) that one of my tabs wasn't pulled to the back properly so I redid that spot.
 I repressed everything (with my fingers and iron) and made sure the tabs were attached to the charm. I let it dry for a  minute or two.
 11. When I flipped it over to the wrong side, I checked to make sure the tabs were glued to the charm (red) and not sticking to the cream fabric. You can see I actually lifted it up all the way around.
 12. Now I got ready to stitch the two together. I positioned it so that the wrong side of the charm (red) was facing down and the tabs could be seen glued to the right side of the charm.
 13. You are going to stitch close to the right side of the  fold of the tab. Do not cross over the fold..its better to veer away from the fold than into it. Back stitch at the beginning and end to secure.
 I pulled back the cream fabric to keep it out of the way of the stitching and so I could see the fold.
 Here is a good pic of the stitching to the right of the fold....
 14. Remove fabric and cut threads. Now it just needs pressing and a little trim!
 15. Trim the excess fabric....mostly the corners so that there is a seam allowance of about a 1/2".
 16. I pressed the right and wrong side of the fabric quickly just to set the stitches flat and see what I am working with.

 17. Now this is the final step and the one that makes it look like a hand-turned applique! Using the iron, I folded the tabs onto the circle. Slowly go around and press each one in and then really steam press the whole thing to set it.


 Whalaa!!! All finished...here's the front:
Hope this helps you make perfect circles!!!
Enjoy the rest of your day!
~Cathy